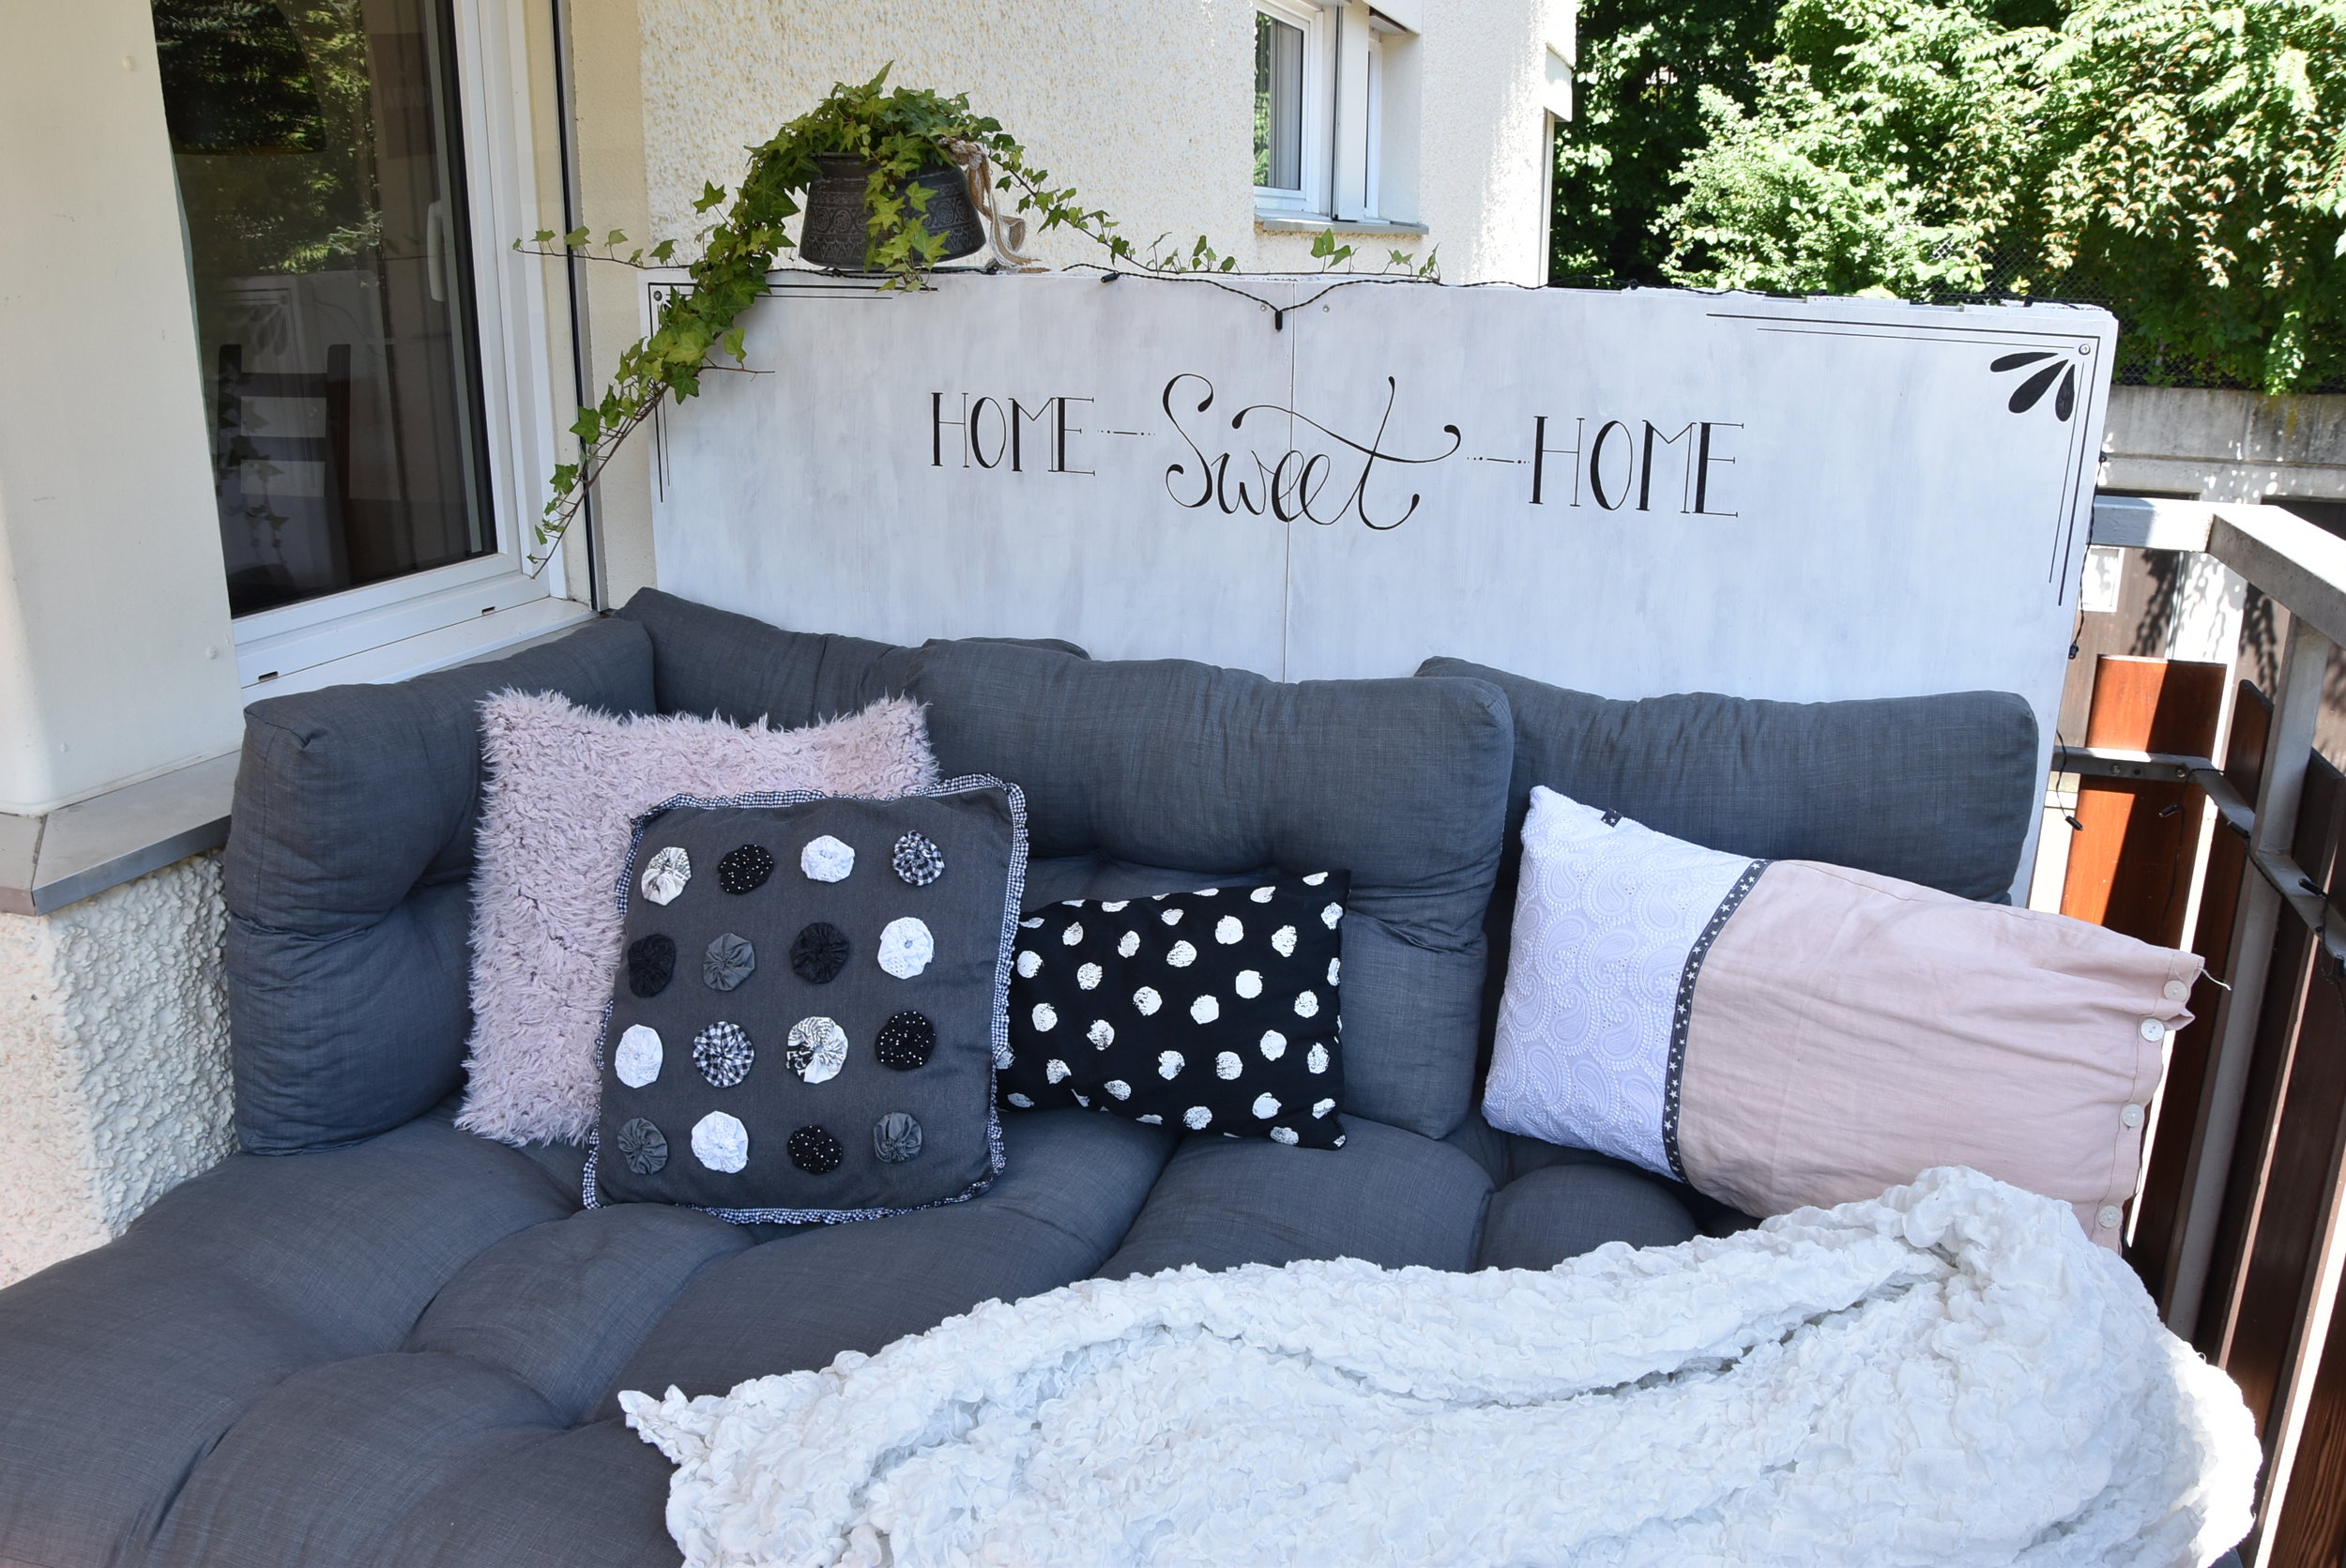
DIY-Palette couch - DIY-Palettensofa

LAD_0750.JPG

I am soooooooooo excited to share this project with you! It is possibly one of the biggest things I ever made and it took me several months to finish it. I made this palette couch for our balcony and I just have to say, we love it. It perfectly fits into the corner of our balcony and creates an oasis of rest. Since I decided to take the bottom palettes length wise, it is almost like an outdoor day bed for us. The first time we sat on it it actually rained a little bit and it was just the most perfect and peaceful shelter.
Another reason why I am so excited about it, is because I documented the entire process with photos, so you can do it as well! And don’t be scared because I said it took me several months. You can finish this in probably a week if you want to. And most of it is just waiting for the paint to dry. It took me so long because I had to wait for free weekends, nice weather (so the paint wouldn’t wash away while drying) and tools and machines. So here is the full process of building a palette couch:


Ich freue mich riiiiiiiieeeeesig dieses Projekt mit euch zu teilen! Es ist wahrscheinlich eines der grössten Projekte, die ich jemals gemacht habe und ich brauchte mehrere Monate um es zu beenden. Ich machte dieses Palettensofa für unseren Balkon und ich muss sagen, wir lieben es. Es passt perfekt in die Ecke unseres Balkons und es erschafft eine Ruheoase. Da ich mich entschieden habe, die unteren Paletten der Länge nach zu benutzen, ist es schon fast wie ein Aussenbett für uns. Das erste Mal, als wir auf unserem Sofa sassen, regnete es leicht und es war einfach ein perfekter, friedlicher Rückzugsort.
Ein anderer Grund weshalb ich mich so über diesen Post freue, ist, dass ich den ganzen Prozess mit Fotos dokumentiert habe, damit ihr alles selber nachmachen könnt! “Mehere Monate!”, denkt ihr jetzt vielleicht. Aber so schlimm ist es gar nicht. Man kann das Sofa in einer Woche fertig machen, und die meiste Zeit vergeht fürs Trocknen der Farbe. Es dauerte bei mir so lange, da ich auf freie Wochenende, schönes Wetter (damit die Farbe beim Trocknen nicht davon läuft) und Maschinen und Werkzeuge warten musste. Hier also der ganze Prozess mit Anleitung:

WhatsApp Image 2019-08-08 at 21.13.11-6.jpeg
WhatsApp Image 2019-08-08 at 21.13.11-5.jpeg

What you need:

  • 6 Paletts (they are around 10 Swiss Franks, probably cheaper in other countries)

  • Wooden board for the backwall, measure the length on the palettes

  • Sander (or sand paper)

  • Drill

  • 20 long, big countersunk screws (about 5cm long)

  • 8 short countersunk screws (about 2cm long)

  • 2 L of wood impregnation oil

  • 2.5kg of white, waterproof paint

  • wide brush and/or paint roller

  • newspaper to cover the ground

  • pencil and eraser

  • ruler

  • waterproof black pen


Das braucht es:

  • 6 Europaletten (kosten in der Schweiz pro Stück etwa 10 Franken)

  • Holzbrett für die Rückwand. Länge und Breite bei den Paletten abmessen.

  • Schleifmaschine (oder Schleifpapier)

  • Bohrmaschine und Bohrer

  • 20 lange, grosse Senkkopfschrauben (Länge 5cm)

  • 8 kurze Senkkopfschrauben (Länge 2cm)

  • 2 Liter Holzimprägnierungsöl

  • 2.5kg weisse, wasserfeste Farbe

  • Breiter Pinsel und/oder Farbroller

  • Zeitungen zum Abdecken des Bodens

  • Bleistift und Gummi

  • Massstab und Gliedermassstab

  • Wasserfester, schwarzer Stift

WhatsApp Image 2019-08-08 at 21.13.15.jpeg
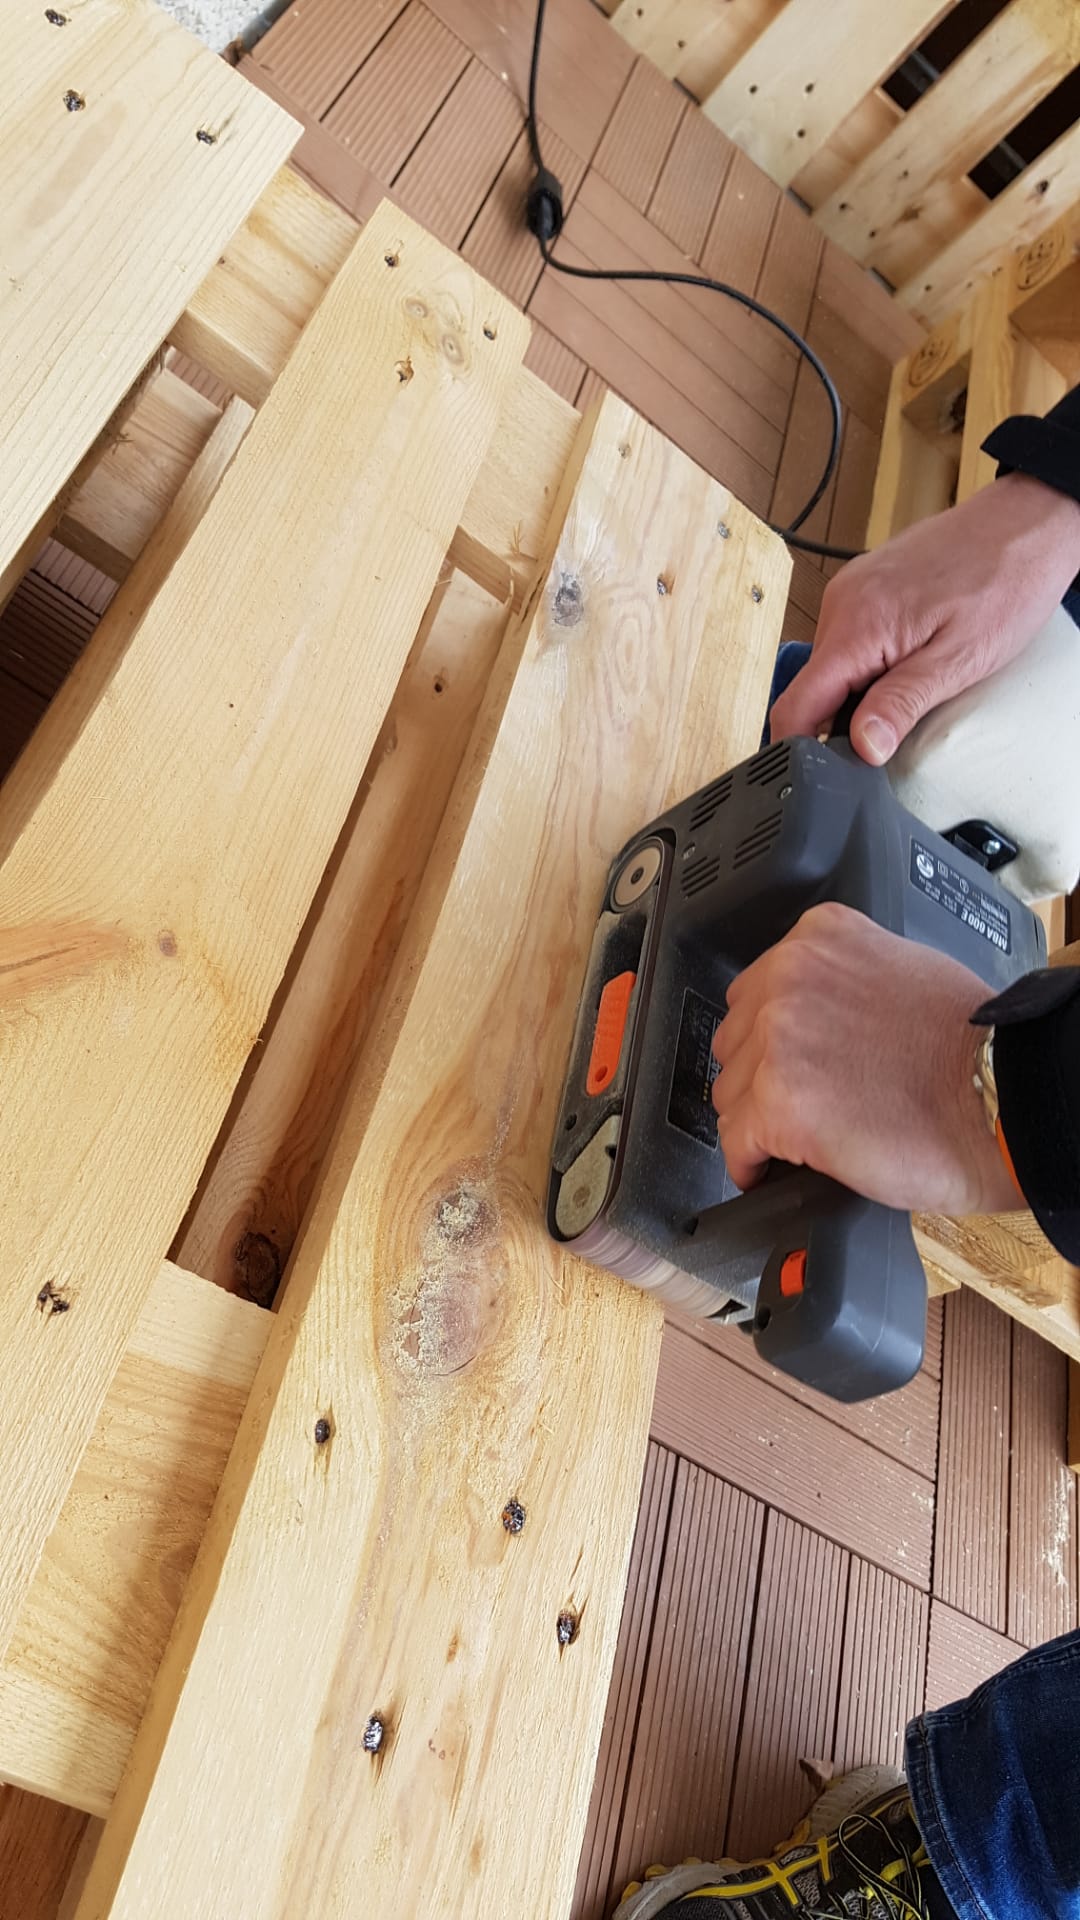
  1. Choose four palettes that will be on top of our couch. Two for the bottom and two for the back. Sand them down with the sander until the surface feels smooth. This will be beneficial for two reasons: First it feels nicer to sit on it and you don’t have to be afraid to get a splinter, second it will suck up a whole lot less paint! Make sure you also “break” the edges (make them round) so you don’t hurt yourself on them later on.

  2. Put two palettes on top of each other and screw them together. Take two of the long screws on each side (4 per two palettes). You will probably have to do this at an angle and it won’t look super pretty but it doesn’t matter in the end. Do the same with two more palettes.

    Take one palette (which will be the backwall) and screw it onto the bottom part. Do the same with the second one. I didn’t attach the two couch parts so it would be easier to move around.


  1. Suche vier Paletten aus, die oben auf dem Sofa sein werden. Zwei für die Sitzfläche und zwei für hinten beim Rücken. Schleife sie mit der Schleifmaschine bis die Oberfläche fein ist. Dies wird aus zwei Gründen nützlich sein. Erstens fühlt es sich besser an und man muss keine Angst vor Holzsplittern haben und zweitens saugt das Holz viel so viel weniger Farbe auf. Breche auch die Kanten und Ecken (abrunden) damit du dich nachher nicht daran verletzt.

  2. Nimm zwei Paletten und lege sie aufeinander. Nimm zwei der langen Schrauben pro Seite und schraube die Teile zusammen. Mache das selbe nochmals mit zwei anderen Paletten.
    Nimm eines der übriggebliebenen Paletten (Rückwand) und schraube sie an den Boden. Mache das selbe mit der letzten Palette. Ich habe die zwei Sofateile nicht zusammengeschraubt, da es so leichter zu bewegen ist.

WhatsApp Image 2019-08-08 at 21.13.15-3.jpeg
WhatsApp+Image+2019-08-08+at+21.13.15-2.jpg

3. Cover the ground with newspaper and make sure to also cover under the palettes. The oil impregnation may be transparent but it does stain the floor permanently. Wipe the wood with a damp cloth to clean off all the dirt and dust and let it dry. You can only paint the wood if it is dry otherwise it can get moldy under the paint.
Then paint the palettes and the two wooden boards. It is up to you how much you cover with it. Make sure to cover the parts that could get wet though. If your couch will be inside you can skip this step.


3. Belege den ganzen Boden mit Zeitungen. Auch unter den Paletten abdecken, da die Ölimprägnation den Boden verfärben kann. Wische mit einem feuchten Lappen über das Holz um allen Dreck und Staub zu entfernen. Mit malen beginnen kannst du, wenn das Holz sicher ganz trocken ist. Ist es noch feucht, dann kann sich später Schimmel unter der Farbe bilden.
Bemale die Paletten und das Holzbrett. Entscheide selber welche Teile du bemalen willst, benutze die Farbe sicher dort, wo das Sofa nass werden könnte. Falls das Sofa für drinnen ist, kannst du diesen Schritt überspringen.

WhatsApp Image 2019-08-08 at 21.13.15-4.jpeg
WhatsApp Image 2019-08-08 at 21.13.14-2.jpeg
WhatsApp Image 2019-08-08 at 21.13.14-3.jpeg

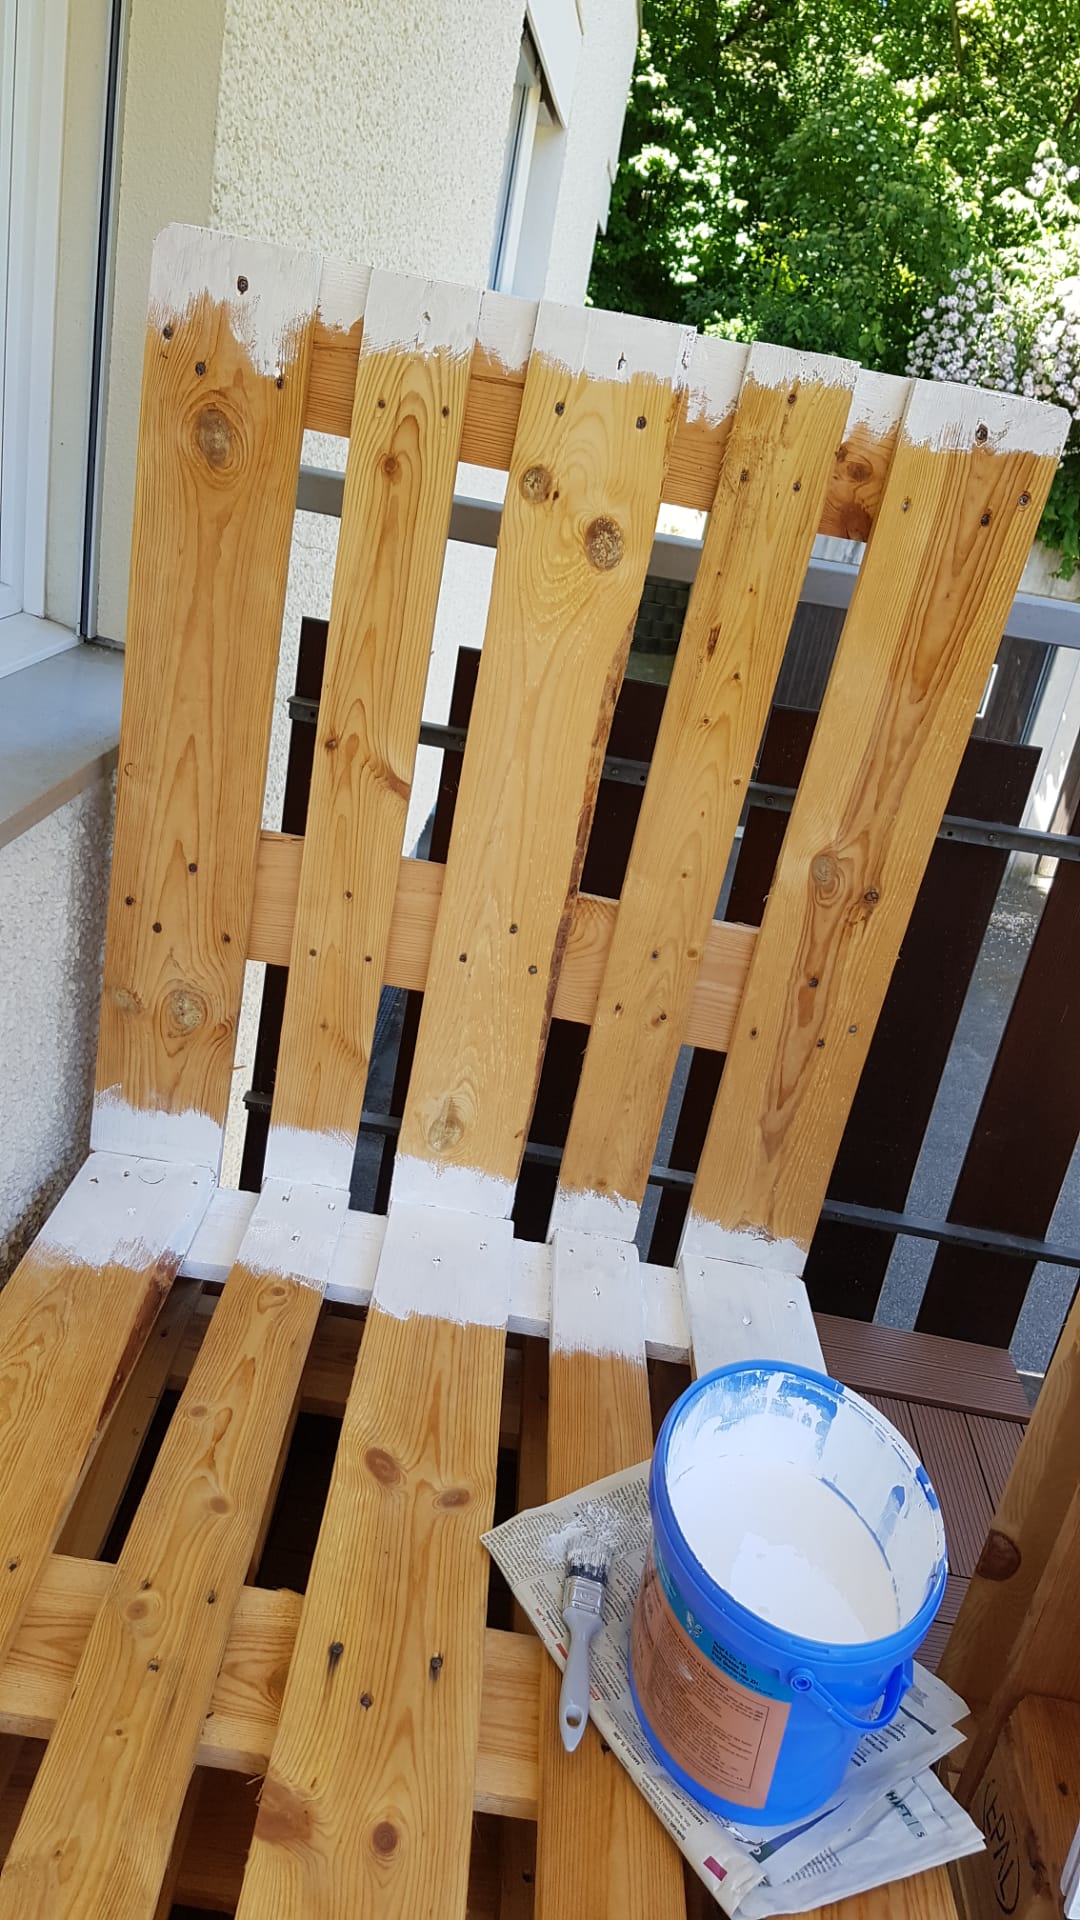
4. As a next step you will paint the couch with the color you chose. I didn’t paint everything, simply the visible parts but of course you can do it all too. You will also have to paint the wooden board(s) for the back wall.


4. Der nächste Schritt ist das Bemalen mit der Farbe. Wie du auf den Bildern sehen kannst, habe ich einfach die sichtbaren Teile bemalt. Man kann aber auch gut alles bemalen. Das Brett oder die Bretter für die Rückwand muss ebenfalls bemalt werden.

WhatsApp+Image+2019-08-08+at+21.13.13.jpg
WhatsApp+Image+2019-08-08+at+21.13.13-2.jpg
WhatsApp+Image+2019-08-08+at+21.13.13-3.jpg

5. Take the wooden boards and sketch out the words with a pencil. If you are not familiar with lettering it might help to sketch it out on paper first. To start out with I put the pillows on the board, so I could see how high up the would reach. Then I put down the ruler, so I would be writing in a straight line. Start out with the middle word, so it will be aligned with the middle line. Erasing didn’t work that well for me, as it smeared the pencil around. It might be different for you though depending on the paint and eraser you use. You can also add all kinds of decorative elements to the board.


5. Nimm das Holzbrett und skizziere die Buchstaben mit Bleistift auf das Brett. Wenn du noch keine Erfahrung mit Lettering hast, hilft es das Ganze zu erst auf Papier zu skizzieren. Zu Beginn habe ich die Kissen auf das Brett gelegt, damit ich wusste, wo die Wörter sehen müssen. Dann legte ich den Massstab darauf, damit ich gerade schreiben würde. Beginn beim Schreiben mit dem mittleren Wort, damit nachher auf beiden Seiten etwa gleich viele Buchstaben sind. Radieren hat bei mir nicht so gut funktioniert, da es den Bleistift mehr verschmiert, als weggemacht hat. Das kommt aber sehr auf die Farbe und den Radiergummi an. Du kannst auch allerhand dekorierende Elemente dazu zeichnen.

WhatsApp+Image+2019-08-08+at+21.13.13-5.jpg
WhatsApp+Image+2019-08-08+at+21.13.12.jpg
WhatsApp+Image+2019-08-08+at+21.15.05.jpg
WhatsApp+Image+2019-08-08+at+21.13.12-2.jpg

6. Trace the pencil lines with the black, waterproof marker. When you’re done and the marker is really! dry you can erase the pencil lines.


6. Überschreibe die Bleistiftlinien mit dem schwarzen, wasserfesten Stift. Wenn du fertig bist und der Stift wirklich! getrocknet ist, kannst du den Bleistift radieren.

WhatsApp Image 2019-08-08 at 21.13.12-3.jpeg
WhatsApp+Image+2019-08-08+at+21.13.12-4.jpg
WhatsApp+Image+2019-08-08+at+21.13.11-3.jpg

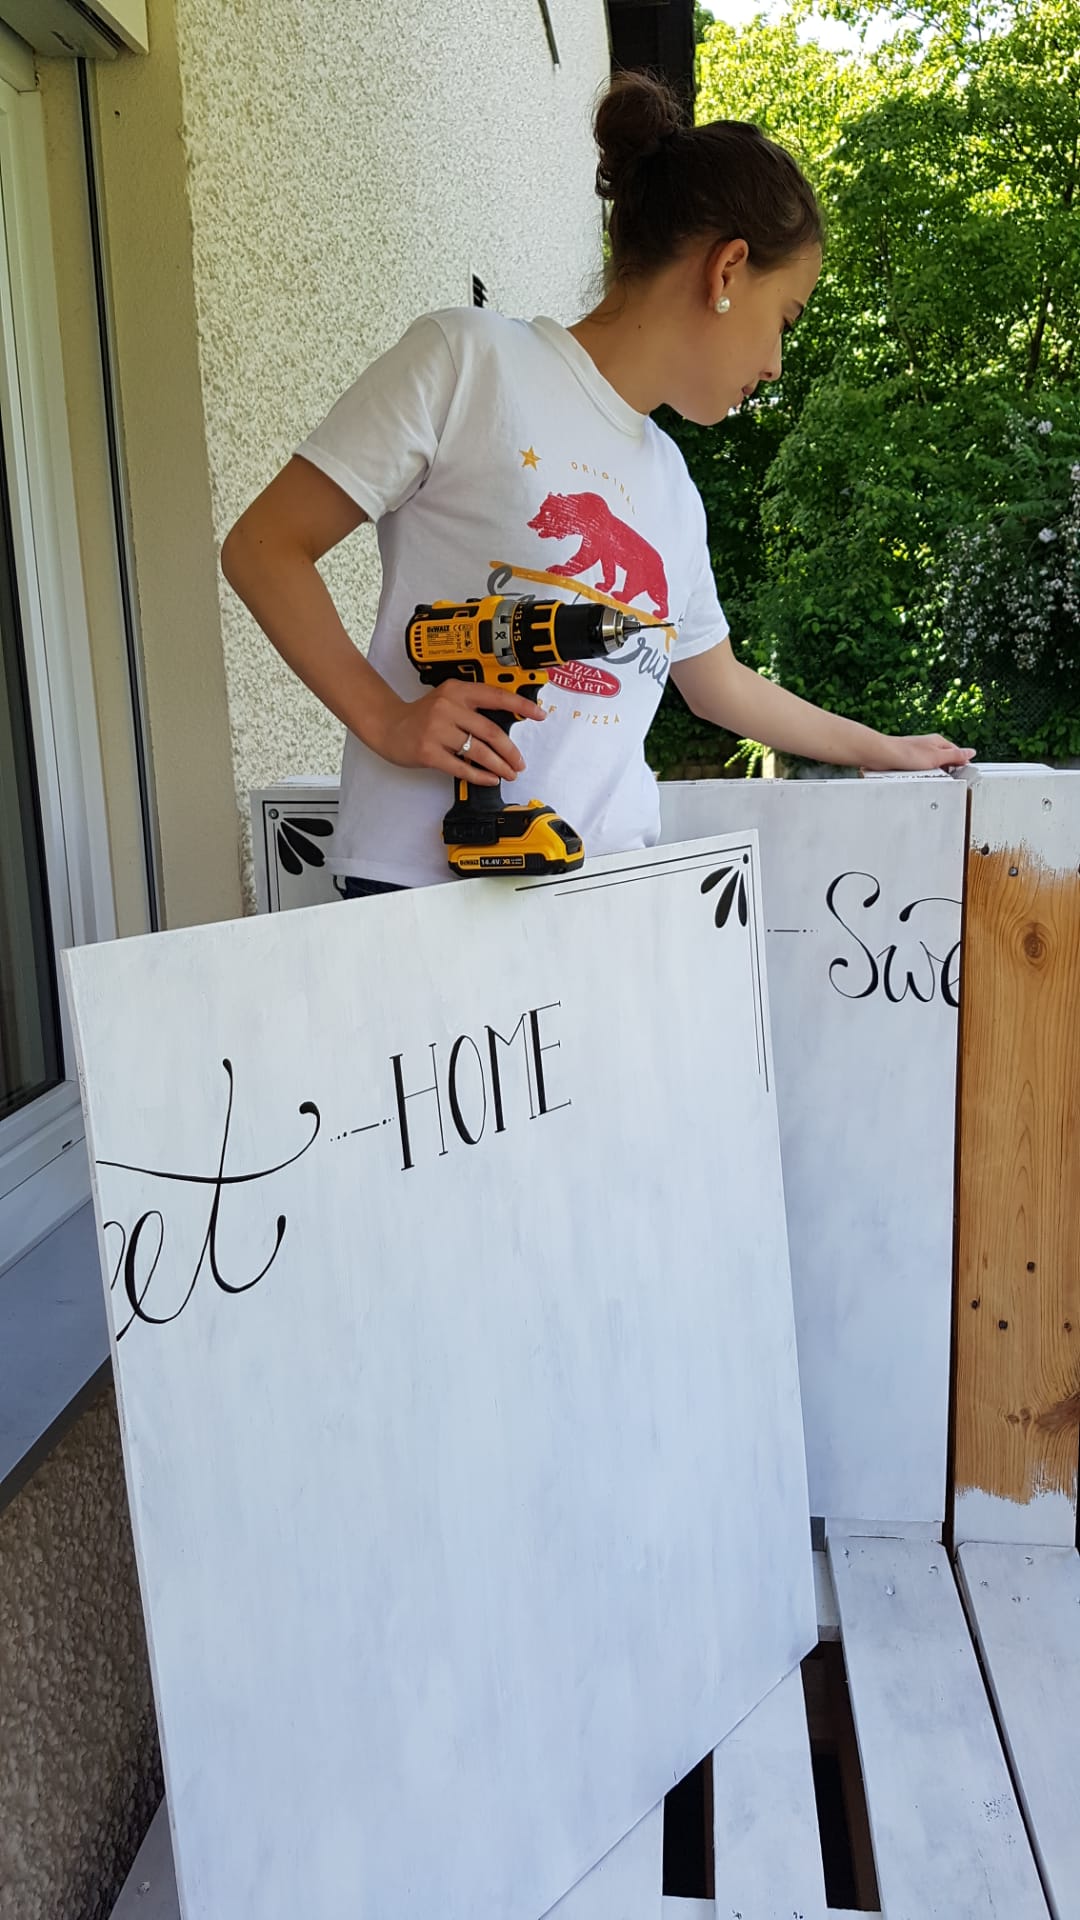
7. As a last step you screw the board(s) on the palettes. I did four of the short screws per palette, one in each corner. And voila: Here is your DIY palette couch!

7. Im letzten Schritt müssen die Bretter an den Paletten angeschraubt werden. Ich benutzte vier von den kurzen Schrauben, einer pro Ecke. Voila: Hier ist dein DIY-Palettensofa!

WhatsApp Image 2019-08-08 at 21.13.11-4.jpeg
LAD_0748.JPG